Roll20 Music Has X Over It After Upload
The P Art Library is the second tab from the left of the Sidebar, and is attainable to you for whatsoever game where you are a GM .
This tab allows you to search, upload, and organize any JPG, PNG, GIF and other paradigm files that you wish to use in your game.
![]()
The Fine art Library
Contents
- ane Searching For Art Avails
- ane.1 The Search Bar
- 1.i.1 Roll20 Search Parameters
- 1.2 Paradigm Search Type Drop-Down Bill of fare
- ane.3 Search Manner Toggle
- ane.1 The Search Bar
- 2 Placing Graphics onto the Tabletop
- iii Premium Assets & My Library
- iv My Library
- four.one Uploading Art
- iv.ane.1 Blithe
- iv.2 Recent Uploads
- 4.3 Paradigm Storage Quota
- 4.3.1 Freeing Up Storage Space
- four.one Uploading Art
- 5 Organizing Your Images
- 5.1 Folders
- 5.1.i Sorting Subfolders and Images
- 5.i.2 Folder View
- 5.2 Tags
- v.three Optimal Organization Method
- 5.4 Favoriting Premium Assets into My Library
- 5.1 Folders
- vi Sidebar
Searching For Art Avails
![]()
The Art Nugget Search
The start part of the Art Library tab is the image search department. Afterward running a search, the results volition list below the search bar in this descending club:
- My Library: Any image yous accept personally uploaded to Roll20 and stored on your business relationship'southward allotted epitome storage (quota)
- Marketplace Purchases: Whatever available paradigm from an fine art set you have bought off the Roll20 Marketplace
- Pro Sets: When a user has a
Pro
info subscription, Sectional Token Sets becomes available in-app. - Free Avails: Images from art sets made available to the Roll20 community to use for free in their games. (Annotation: Not for commercial resale purposes)
- Premium Avails: This initially lists a cross section of popular packs from the Roll20 Marketplace(Market place), highlighted in pale yellowish. These assets have been created specifically for use in Roll20 past customs members like you. Marketplace avails tin can be expanded by clicking on More Premium Assets » to testify upward to 100 dissimilar items and tin be purchased directly past clicking on whatever image which opens up its pack's Market listing in a new window.
- From the Web This section is shaded in calorie-free bluish and pulls images cached from various TTRPG prototype resources around the spider web.
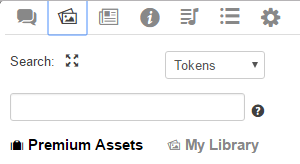
The Search Bar
This is where yous run your search for fine art avails. An fine art search matches your keywords with image file names, tags, or the folder names your assets are stored in.
Roll20 Search Parameters
Searching with more than one keyword is inclusive, helping you lot refine your search to only assets that match both words.
ex.
red dragon ...will render results that lucifer "ruby-red" AND "dragon" together, simply not just "dragon".
Boolean Searches
Optionally, you can employ the OR keyword to get an boolean search, where results will exist returned if either word matches whatsoever criteria.
ex.
h2o way or swamp ...will return results that match "water" AND "way", OR "swamp", only not "water" AND "swamp".
Exclusive Searches
Yous can too refine your search farther by adding a "-" symbol before a word to exclude all results that keyword matches.
ex.
giant -burn down ...will return results that match "giant" merely if that item does not besides accept the keyword "fire".
![]()
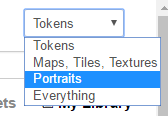
Above the search bar is a driblet-downward menu where you can choose the Image Search Blazon. This narrows the search to specific tags assigned to images on the Roll20 Marketplace, Pro & Free Avails, and collected resource from diverse tRPG image sites. This is broken downward into four categories: Tokens, Maps, Tiles, Textures, Portraits, and Everything. If you want to bandage the broadest net with your search, choose the Everything choice.
Search Style Toggle
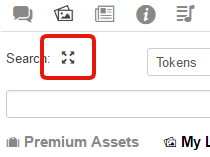
![]()
Also in a higher place the search bar is an expanding icon abreast the word Search:. This is the Search Style toggle. Clicking on this icon volition bandy between small and large thumbnail display of the images found in the search results.
![]()
drag-n-drop images from your P Art Library to the map.
Placing Graphics onto the Tabletop
Once you've establish, purchased, or uploaded the fine art assets y'all'd like to use to your P Art Library, simply drag and driblet information technology from either the folder view, the Recent Upload listing, or from a sub folder onto the Tabletop/map.
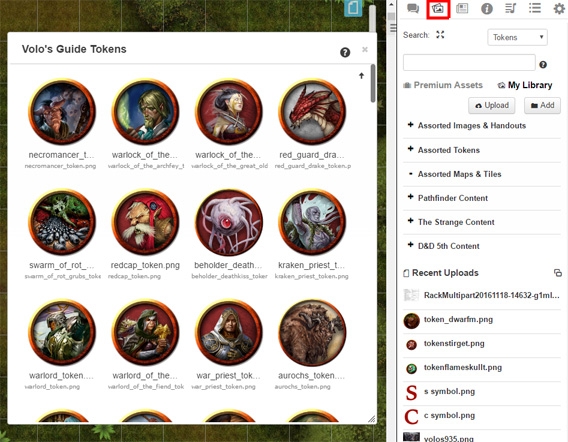
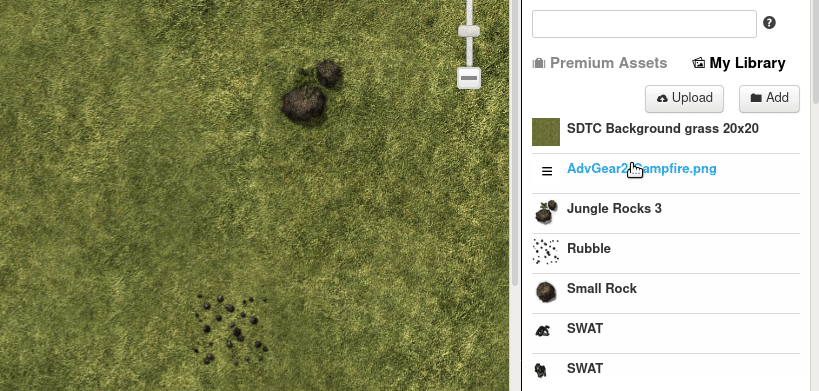
Premium Assets & My Library
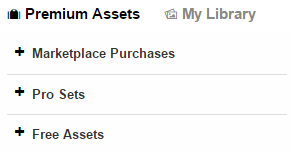
The Premium Assets View
When not searching for images, below the Search Bar is your image index. There are two indexes that yous can swap betwixt at any fourth dimension are Premium Assets and My Library. Everything nether Premium Avails are images that you have not uploaded to Roll20 nor practise they count towards your account's epitome quota when you use them in your games. Folders for Marketplace Purchases, Pro Avails, and Free Assets are listed here.
Everything listed under My Library is content that you have personally uploaded into your games and stored on your Roll20 business relationship. These images in My Library do count towards your image quota.
My Library
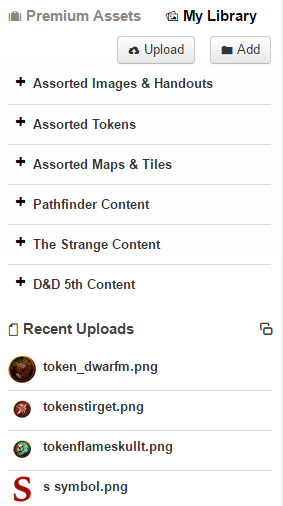
My Library View
Any and all prototype content you upload to Roll20 volition be added to My Library. When y'all toggle to the My Library view in the P Art Library, you'll first have ii buttons for uploading images and for creation of folders. Underneath that is an area that shows the folder tree (if you take created any). Underneath that is the Recent Uploads image list.
Roll20 supports the following image file types: jpg, png, gif, animated gif, mp4, webm & PDF (upon upload, you'll be asked which page from the PDF will exist converted to an image).
For information on optimizing your files for utilize on Roll20, see the All-time Practices guideline.
Uploading Art
There are 2 methods for uploading art to Roll20. The get-go way is to click and drag a single paradigm from your file explorer/computer to the Tabletop and it volition upload besides as place the graphic where you designated on the Tabletop.
The second manner is to click on the Upload button underneath My Library. This pops open up a dialog box chosen Upload Files.... This dialog box has a dashed-border rectangle where y'all can drag a maximum batch of 10 images at a time to upload them all at in one case. Yous can also select images 1 at a time with the Cull a file... button which brings upwardly a file choice menu to browse for files on your computer/device.
File Size Cap: If you have a Gratuitous account, no single image or batch upload can exceed 5MB. For
Plus
info &
Pro
info -subscribers, this cap is raised to 10MB.
All uploaded art, regardless of upload method, is automatically placed into Contempo Uploads in chronological order with the about recently uploaded image added to the top of the list.
Animated
If you create your own animations, it's probably best to have at least 3 frames in the animation, as there is at least one user who had visual issues with a .gif that only had two frames.
Some people feel extremely slow upload speeds for animated .mp4 and .webm-files, or the upload might time out repeatedly.
One Roll20 Dev seems to suggest .webm files cause less trouble, merely by and large seems .gif only works all-time.
Forum threads give-and-take issues around uploading animated assets to Roll20:
- result with mp4 and video uploads(Forum)
- Uploading gifs to game particular pages November 2021
- .gif upload question
- Problems Uploading Gif or Webm archives
- Uploading Videos to Roll20
- .gif and .webm are taking obscene amounts of time to upload.
Recent Uploads
When you upload an images, information technology is placed in a location in My Library chosen Recent Uploads. You can see the Recent Upload list at the bottom of My Library and will list the images chronologically from the most recently uploaded image to older.
Every single piece of art remains in here fifty-fifty if yous motion them into a binder or subfolder. Organizing fine art into folders is only making a reference of the prototype. You can filter your view of Recent Uploads to hibernate any image that's already been organized into the folder tree past clicking on the icon beside the Recent Uploads heading that looks similar two windows overlapping.
To permanently delete an image from My Library, information technology must exist deleted from Recent Uploads to actually clear it from your Storage Quota.
Paradigm Storage Quota
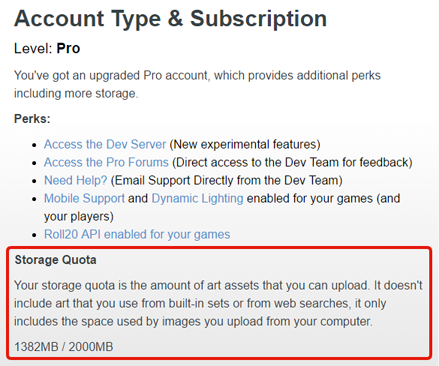
![]()
Your storage quota is the amount of art assets that you can upload. It doesn't include art that y'all apply from built-in sets or from web searches, information technology just includes the infinite used by images you upload from your figurer.
Marketplace content doesn't count confronting your storage, and neither does things in your campaigns like characters, handouts, etc.
Storage Quota:
- costless account -- 100MB
-
Plus
info accounts -- 3,072 MB (iii GB) -
Pro
info accounts get 6,144 MB (6 GB).
Y'all tin check your Storage Quota usage on your Account-folio underneath the Account Blazon & Subscription section on the correct side of the page. You can also see it at the top of the Recent Uploads Folder View Window, direct higher up the first row of image thumbnails and below the reddish deletion warning bulletin.
Going over your quota will non delete anything from your library, just stop you lot from upload more.
Freeing Up Storage Space
Once yous hit your storage quota chapters, Roll20 will disallow any further uploads until room is made for them. This is either done by deleting some of your art avails from My Library, or upgrade your account to
Plus
info or
Pro
info subscriber status for a larger storage quota.
To delete art assets, you can correct click on an image in the Recent Uploads list and cull Delete Item. This will permanently remove that fine art asset from My Library and any game that is currently using information technology. With that in listen, you volition want to make certain that the images you are deleting are not necessary for electric current game content you're actively playing with.
Organizing Your Images
At that place are two different ways to help organize the images in My Library: Folders and Tags.
Folders

An example of nested image folders under My Library
Much like the Journal tab of the Sidebar, folders can exist used in the Fine art Library to help organize your images into subgroups.
Calculation Folders: Add a new folder using the Add push underneath My Library. Follow the instructions on the prompt to name the folder and striking OK to add the folder to My Library.
Folder Options: Right click the folder to reveal this listing of options: Add together Subgroup, Sort A-Z, Rename Folder, Delete Folder
-
- Add Subgroup: This behaves exactly like clicking on the folder Add button. You'll get a prompt to enter a proper noun for the new folder and one time confirmed will create a new subfolder underneath the current one.
-
- Sort A-Z: This will sort any images inside the folder to be sorted alphanumerically. Any subfolders will exist sorted and listed earlier whatever images.
- Rename Binder: This volition bring up the prompt again to change the name of the folder.
- Delete Folder: This will delete the folder. Deleting folders volition not delete any images independent inside. Those images will be moved dorsum to Recent Uploads. Using the Delete Binder option requires your approval upon apply, ostend when prompted to initiate your action.
Sorting Subfolders and Images
-
- Expanding and Collapsing the Folder Nest: Each folder and subfolder has an icon directly to the left of its folder proper name. This icon toggles between a + and a - symbol. Clicking on this icon either collapses the folder/subfolder (-) or expands information technology (+).
-
- Moving Folders: That aforementioned +/- icon beside the folder name is likewise a handle where you can click and drag to move the folder to a different location in the binder nest. A binder needs to be in its expanded state for a binder to be nested inside it.
-
- Adding Images into a Folder: Much in the same fashion you movement a binder into a folder, y'all tin can click and elevate images into an expanded folder. You can drag them directly from the Recent Uploads listing, or elevate a batch selection from within the Folder View window. Just similar adding subfolders, you need to make certain your target binder location for your image(s) is in its expanded state to place them inside.
Folder View
Clicking on an image in the Contempo Upload list, an prototype in a folder, or on a folder/subfolder name, volition open upwardly a new window displaying larger thumbnails of available subfolders and all images independent within the selected folder (In Recent Uploads, information technology will show all uploaded images sitting at Root). In this view y'all have the ability to do several batch actions similar mass deletion, mass selection, and mass epitome relocation. This is where you can likewise add and remove Tags to images.
-
- Navigating to Nested Folders: Double clicking on a subfolder in Binder View will navigate and open the called subfolder in Folder View.
-
- Batch Epitome Option: To select multiple images, click on each desired thumbnail while in Folder View. This will highlight each selected image in stake blue. To remove an image from a selection, just click on the image thumbnail to remove it from the current option.
-
- Right Click Options Card: While inside Binder View, right clicking within information technology brings up the following options menu:
-
-
-
- Select All: This will select every unmarried epitome in the folder.
- Add Subfolder: This will add a subfolder (if able to practise so) and prompt you to create a name for it.
- Tag Selected: This will add a Tag to all images currently selected. (See the Tags section for more info)
- Remove Tag: This will remove a specific Tag from all images currently selected. (Meet the Tags section for more than info)
- Sort A-Z: This sorts all folders and images into alphanumerical order, folders are sorted beginning.
- Delete Selected: This will remove images from the folder. Annotation: If you lot delete images from the Recent Uploads Folder View, you will delete them permanently and this can not be undone.
-
-
-
- Batch Prototype Relocation: While you take a collection of images selected, you can click and drag the entire batch to a binder or subfolder in My Library to relocate them to that folder:
-
-
- The items to be moved should exist selected as thumbnails in the pop-out view, and the destination folder should exist in the correct-console of My Library
- Your target folder location must be in expanded country to place images within it
- If you are having problem moving the items into the folder, try nesting the first item in the series, then dragging the contents over the nested detail
-
-
- Batch Prototype Relocation: While you take a collection of images selected, you can click and drag the entire batch to a binder or subfolder in My Library to relocate them to that folder:
Tags
Tags are keywords that y'all can assign to various objects in Roll20, images included. When y'all run an image search, it will attempt to match your keywords with any tags you've added to your images. This makes it easier to locate previously uploaded images without having to recollect their filename from memory.
-
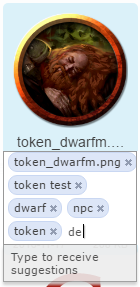
- Adding Tags: To add together tags to an image, you must first exist in folder view, either in Recent Uploads or a subfolder of your choice. For adding a tag on a unmarried image, click on the smaller version of the image's file proper noun that sits right above the upload date and file size data (the filename automatically becomes its own tag upon upload). This opens upwards the tag field to enter new tags for the image. Hitting the space bar or enter/return cardinal will create the tag and allow you to enter another. If you lot want a multi-word tag with spaces, y'all'll need to copy and paste the multi-discussion phrase in rather than type it out equally a direct printing of the infinite bar auto-completes the tag. If at that place's a tag you made previously for other images, suggestions of previous tags will appear below the tag field equally you type. Pressing the upward or downward pointer will page through the available choices and striking the Enter/Return key will set the chosen one as the new tag.
-
- Removing Tags: To remove tags from an prototype, y'all first need to bring up the tags field every bit if yous were to add more than. Each tag has an 10 following the tag proper noun. Clicking on this X deletes the tag from the image. Sometimes due to tag length, the name may stretch by the boundary of the tag field. In this example you may not have access to the X to delete the tag. In this state of affairs, you can also click on a tag, which highlights it in a night bluish and then hit the Delete or Backspace primal to remove the tag.
-
- Batch Tagging/Tag Deletion:* You tin click on multiple images at a fourth dimension in binder view to select them as a group. They will highlight the selected images in pale bluish. Click on whatsoever prototype a 2d time to remove it from this selection. While a batch of images is selected right click anywhere amongst them to bring up an options carte. Two of the bachelor options is Tag Selected and
-
- Remove Tag. Selecting either of these two options will pop upward a new dialog box asking y'all to type your desired tag to add or delete respectively from the selected batch of images. Note: You can only add or remove one tag at a fourth dimension.
- *We're aware that this characteristic currently doesn't work in the Contempo Uploads folder view. This is a known bug we promise to address soon.
Optimal Organization Method
We recommend this methodology every time you upload artwork:
- Upload your art for a given game/page/system
- Tag your images in the Recent Uploads
- Sort your images out of Recent Uploads into a sub-folder
If you stay on tiptop of this process each time you lot upload new images, you'll have an easier time maintaining your art library and your storage quota.
Favoriting Premium Assets into My Library

If there's a token, tile, or other epitome from the Premium Assets that yous'd like to integrate into My Library, you tin can practice this by right clicking on an image from Marketplace Purchases, Pro or Free Avails, or From the Web. This volition bring upwardly ii options: Copy to Library and Copy to Folder. Copy to Library volition create a reference to this image and place information technology above the Recent Uploads listing and higher up any epitome folders yous have. Copy to Folder will add a text entry below the option for you lot to type the name of the folder you wish to add the image to. Folder suggestions (when available) will listing below after typing a few characters.
These images y'all'll be able to Tag, sort, and organize only like whatsoever other uploaded image asset in My Library. The important distinction with these copies is that these images are referring back to content in Premium Assets. They are not copying the images to My Library and therefore does non count towards your Paradigm Storage Quota.
- q Text Chat
- Complete Guide to Macros & Rolls
- P Art Library
- N Journal
- Character Sheets
- i Compendium
- u Jukebox
- 50 Collections
- Macros
- Playing Cards
- Rollable Tables
- y My Settings
- Advanced Keyboard Shortcuts
Source: https://wiki.roll20.net/Art_Library
0 Response to "Roll20 Music Has X Over It After Upload"
ارسال یک نظر